Monday, October 31, 2011

The Weekend

This past weekend my parents came down to visit, and we had such a great time!  We went to the last farmers' market of the year, walked around downtown, perused our favorite bookstore, watched football, drove around looking for houses for sale, and ate way too much food.  I really enjoyed hosting my parents; it was fun being the one doing all of the cooking and preparing for them to be here, instead of the other way around.  

Happy Halloween!


Friday, October 28, 2011

Frozen Hot Chocolate


The last time I was in New York, my best friend and I planned to go to Serendipity 3.  There was a two-hour wait when we got there mid-afternoon, and we decided we didn't feel like waiting that long, even for the famous frozen hot chocolate.  It was the middle of winter but I still wanted to try it because I always seem to like drinks better in their frozen form.  Having still never tried frozen hot chocolate, last week I decided to make my own.  I don't know what Serendipity's tastes like, but this one was pretty good!


Frozen Hot Chocolate
3 Tbsp sugar
3 Tbsp hot cocoa mix
2 Tbsp unsalted butter
1/3 cup semi-sweet chocolate chips
1/3 cup white chocolate chips
12 oz can evaporated milk, divided
4 1/2 cups ice

Combine sugar, hot cocoa mix, and butter in the top of a double boiler that is set over gently boiling water.  Stir often until melted and a smooth paste forms.  Add semi-sweet and white chocolate chips; stir.  When chips begin to melt, slowly stir in 1/2 cup evaporated milk.  Stir until smooth.  Cool to room temperature.

Combine the chocolate base mixture, the remaining evaporated milk, and the ice in a blender (can be done in batches) and cover.  Blend until smooth.  Serves 4.

source:  recipe from tasty kitchen

Thursday, October 27, 2011

Decorating for the Fall

I really need to get with it as far as fall decor around my house.  Since we've moved, I've just been focusing on other things.  First it was getting new furniture, then it was hanging things on the wall and getting things framed, and lately it's been the hunt for throw pillows for the couch.  That was the worst of all because I am so picky and couldn't find anything suitable!  We finally got some over the weekend, I had a Skype session with my sister to make sure everything in the living room looked good, and we're done!

OK so fall decorations... this morning I finally got what I already have out but I think I need a little more.  I want a little pumpkin and a wreath.  And something fall-ish to put in an apothecary jar.  I know it's almost November so I'm super behind, but I don't decorate for Christmas until December 1st so I still have weeks of fall to enjoy!  I'm heading to Michael's today, so here are some fall decor ideas to inspire me and help get my craft on.

Making a monogram with silver thumbtacks in a pumpkin


I really like this burlap wreath and it's a DIY that's simple enough for me!


I love how simple these apothecary jars are with just nuts and ribbons


If we get tired of eating all those apples we picked, maybe I'll make these (tutorial here)


How cute are these?!


Some leaves and string and it's a festive votive!


I could do something like this instead of a wreath


Do you have any simple fall decor ideas for me??

Wednesday, October 26, 2011

Vanilla Applesauce


As promised, here is the applesauce we made with some of apples we picked over the weekend.  We actually made two different kinds.  We made a classic applesauce (recipe here) that was easy and turned out really great (no picture of that one, sorry!).  But then I wanted to try something a little different, so we made a vanilla applesauce.  The vanilla applesauce was amazing!  Here the recipe for the batch we made; feel free to change the recipe according to the apples you have and how much cinnamon and sugar you like.  It's a big pot of apples; I don't think you can go wrong!


Vanilla Applesauce
7 Granny Smith apples
7 Pink Lady apples
2 cups apple cider
juice of 1 lemon
1/4 cup sugar + 3 Tbsp
1 tsp ground cinnamon
1 vanilla bean

Peel, core, and chop the apples.  Place in a large stockpot.  Pour lemon juice and cider over all the apples, stir with a wooden spoon.  Add in the sugar and cinnamon.  Split the vanilla bean length-wise, scrape the vanilla into the pot, and then throw in the pod.  Stir all ingredients together.  Cover and heat over medium heat for 50-60 minutes, stirring every 10 minutes or so.  Remove from heat and remove the pod.  Break up any remaining apple chunks with the wooden spoon.  Store in the refrigerator for up to a week.  (We also froze half of ours.)

source:  recipe adapted from Martha Stewart

*Come join the fun at the My Baking Addiction and GoodLife Eats Holiday Recipe Swap sponsored by Beanilla.

Tuesday, October 25, 2011

Chewy Chocolate Chip Cookies


Last week I was craving chocolate chip cookies like mad.  I wanted a classic chocolate chip cookie, but I didn't feel like making the old Tollhouse recipe.  So I tried this one.  And I love how soft and chewy they were!  We all know there's nothing like fresh cookies out of the oven, so make these when someone you love is around so you can both grab one while the chocolate chips are still melty.  That's when they're the best.  And don't forget the milk!


Chewy Chocolate Chip Cookies
2 cups + 2 Tbsp flour
1/2 tsp baking soda
1/2 tsp salt
12 Tbsp unsalted butter, melted and cooled until warm
1 cup brown sugar, packed
1/2 cup sugar
1 egg plus 1 egg yolk
2 tsp vanilla extract
1 1/2 cups semi-sweet chocolate chips

Whisk dry ingredients together in a medium bowl; set aside.  With electric mixer or by hand, mix butter and sugars until thoroughly combined.  Beat in egg, yolk, and vanilla until combined.  Add dry ingredients and beat at low-speed just until combined.  Stir in chocolate chips.

Drop dough onto parchment-lined baking sheets.  Bake, reversing position of cookie sheets halfway through until cookies are light golden brown and outer edges are just starting to harden but the centers are still soft and puffy (about 11-14 minutes).  Do not overbake!

Cool cookies on sheets until able to lift without breaking.  Transfer to wire rack to cool.  Makes about 30 medium-sized cookies.

source:  recipe from annie's eats, originally from Baking Illustrated

Monday, October 24, 2011

Apple Picking

We had gorgeous fall weather this weekend, so Caleb and I took advantage of it and finally went to the apple orchard. It's pretty much the end of the season, but we were able to pick 20 pounds of apples.  We made applesauce for the first time with some of them (recipe coming!) and it was really fun to have Caleb in the kitchen with me for a change.  We just had a lot of fun all weekend together, and I'm a little bummed we're back to Monday morning.  Here's to hoping your week is off to a great start!


Friday, October 21, 2011

Let Me Introduce You

I would like to introduce you to one of my favorite blogs, Only From Scratch.  I am so excited to be guest posting today for Lauren in her series 31 Days of Fall From the Kitchen!  Lauren is not only one of my favorite bloggers, she is also one of my best friends and one of my sisters!  She is seriously one of the best cooks I know (Caleb always gets so excited about what she's going to cook when we go to their house--and it's not like he eats bad around here!), and she also is super crafty and has lots of amazing DIYs to share as she decorates their gorgeous home.
Today I'm sharing one of my new favorite recipes (do I say that all the time? but it's always true!) for these yummy pumpkin muffins with cream cheese filling.  So head on over and check out my post, and then leave Lauren some love!


And just for fun, here's a picture of Lauren and me from this summer.  Do you think we look alike??

Thursday, October 20, 2011

Bold Front Doors

I've always wanted to have a brightly colored front door.  I think a bold front door really makes a statement for the whole house.  Which color do you like best?


Wednesday, October 19, 2011

DIY Halloween Chocolate Covered Pretzels


I have to admit that I'm not a big fan of Halloween treats.  You know, the kind with fake blood and fingers and spiders. I don't like blood or spiders or dismembered fingers anyway, so I certainly don't want to put fake ones near or into my mouth.  But treats that are orange and black?  I can handle that.


What you need to make your own chocolate covered pretzels:

pretzels
Wilton candy melts (I got mine at Michaels)
sprinkles
parchment paper

Place candy melts in bowls and follow the melting instructions on the back of the packages.  Line rimmed baking sheets with parchment paper.  Use two forks to dip each pretzel into the melted chocolate, tapping the forks against the edge of the bowl to drip off excess chocolate.  Place pretzels on parchment paper and add sprinkles immediately.  To add stripes to your pretzels, fill a Ziploc bag with the melted candies, cut a tiny corner off of the bag, and add the stripes immediately after placing the dipped pretzel onto the parchment paper.  Once your baking sheet is full of finished pretzels, place in fridge to allow chocolate to harden all the way. 


P.S.  If you're like me and only eat pretzels with chocolate, try making these M&M Pretzel treats!

Tuesday, October 18, 2011

Map of Manhattan


. . . on a Kate Spade scarf.


Isn't it lovely?

Daily Skin Care Routine

Over the weekend I had several people comment on my face.  I think the word was "glowing" and they were convinced I was pregnant (I'm not).  I thought it was so funny because in the past month or so I've really noticed that I'm finally happy with my skin!  I'm not acne prone, but I had never liked my skin texture or the occasional red splotch I would get.  After getting questions about what I'm using on my face, I thought I'd share with you the daily skin care routine that I've found to be the best for my skin.

I use St. Ives Apricot Scrub every morning when I first get in the shower.


Every morning I cleanse my face with Origins A Perfect World cleanser.
I make sure to cleanse my face after I shampoo and condition my hair
to prevent hairline breakouts.  Also I leave my
cleanser on my face for 30-45 seconds.


After moisturizing I lightly brush on Mary Kay Mineral Powder


Then I use a little bit of Mary Kay Mineral Bronzing Powder in Sandstone.

Before bed I remove my makeup with these and cleanse my face 
Even when I'm really tired I never let myself go to bed
without taking off all my makeup and washing my face.


Again, this is what I've found to be the best for my skin.  It takes a while of trying different products and routines to figure out what works best for you.  For other skin care products that I like and use, see this post.  Also check out Lindsay's blog!  She gives amazing skin care tips that I have found really helpful!

What is your daily skin care routine?

Monday, October 17, 2011

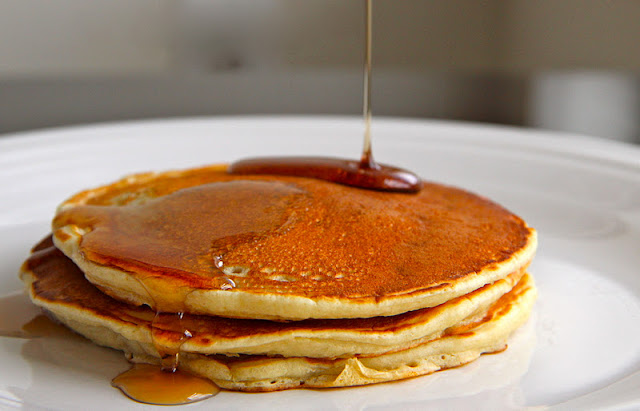
Favorite Pancakes


It may seem silly for me to post a recipe for pancakes, but I'm going to anyway.  When I was little the only pancakes I liked were Bisquick pancakes.  But then we moved to China and Bisquick was not exactly on the shelves of Chinese grocery stores.  So we went to making pancakes from scratch, just like we had to make flour tortillas and salsa and spaghetti sauce and everything else from scratch.  Now these are the only pancakes I will eat.  It's worth the little bit of extra effort for delicious pancakes!  Happy Monday!


Favorite Pancakes
1 egg
1 cup buttermilk
2 Tbsp vegetable oil
1 cup flour
1 Tbsp sugar
1 tsp baking powder
1/2 tsp baking soda
1/2 tsp salt
optional:  blueberries, chocolate chips, or other add-ins

Beat egg; add remaining ingredients in order listed and whisk until smooth.  Grease heated griddle if necessary.  Pour batter onto hot griddle.  (If adding fruit or chocolate chips, sprinkle onto the batter before turning pancakes.) Turn pancakes when they are puffed and full of bubbles but before bubbles break.  Bake other side until golden brown. Makes ten 4-inch pancakes.  

source:  Betty Crocker's Cookbook

Friday, October 14, 2011

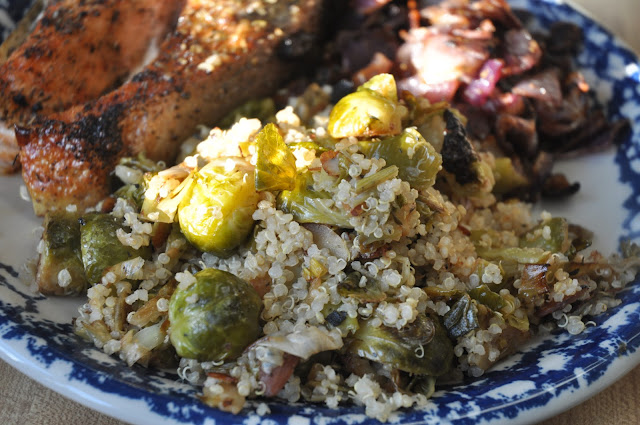
Guest Post: Quinoa with Roasted Brussel Sprouts and Leeks

Today I have Tamar from Random-osity posting for me!  Tamar's blog is full of gorgeous pictures that she takes, and she always has funny stories about something a kid from camp or from her class has said.  Tamar is sharing a delicious quinoa recipe today.  Be sure to stop by her blog and say hi!


Quinoa...kinwa...quinwa.  No matter how you say it, this ancient Aztec grain is all the rage.  I was super skeptical a few years ago, but right around that time I happened to go gluten-free and quinoa fit the GF bill.  At first I was just fixing plain quinoa here and there, and then I began to experiment and search for recipes on the interwebs. Essentially, quinoa can replace rice or couscous in pretty much every recipe, it takes on flavors, it can have a bite, it can be soft, it can be savory, it can be sweet.  Basically put, it's versatile and fun! 

So, when I saw a version of this recipe for Quinoa with Roasted Brussel Sprouts and Leeks on The Gluten-Free Goddess' website I knew I had to try it, with a few of my own tweaks for the types of flavors I liked.  It is a super recipe, and was super easy to assemble.  While I had the leeks, almonds, and brussel sprouts roasting in the oven I had the quinoa cooking away on the stove.


For the quinoa:

-- 1 cup quinoa

-- 2 cups water

-- salt, pepper, garlic powder, and dried herbs of your choice to flavor the water (it makes such a difference!)


Boil according to your package directions - don't over cook, you want a slight bite in the quinoa!


For the veggies:

- 1 leek, washed and sliced

- 1lb brussel sprouts, quarted

- 1/4 cup sliced almonds

- olive oil to coat

- salt, pepper, garlic powder, and italian seasonings to taste


Toss in a roasting pan and bake in a 450ยบ oven until tender and beginning to caramelize.  It took mine about 30-40 minutes, but I like mine really caramelized and tender!


When veggies are finished, remove from the oven and let cool slightly.  Fluff quinoa with a fork and add to pan of quinoa.  And here's the special Tamar addition, drizzle maple syrup over the veggies and quinoa and then add salt and pepper to taste.  This can easily serve 4-6 people, depending on how much quinoa you like to eat!


This may be my new favorite fall quinoa recipe!  My recommendation for cooking with quinoa is to experiment and have fun, the possibilities are endless and nutritious!