Wednesday, March 27, 2013

Shoe Storage

My shoes are taking over my closet. I'm not saying that's a bad problem--I love shoes; it's just they're everywhere and I need to corral them somehow. I was perusing the ol' internet and pinterest to get some new shoe storage ideas, and here are a few I came across. 

1. Wide shelves. This is perfect if you have an empty wall in your closet, 
or if you have room for a short but wider bookcase.
via

2. Shoe Ottoman. This is the most brilliant thing ever: it's stylish 
and functional! It doesn't hold very many pairs of shoes though.
via

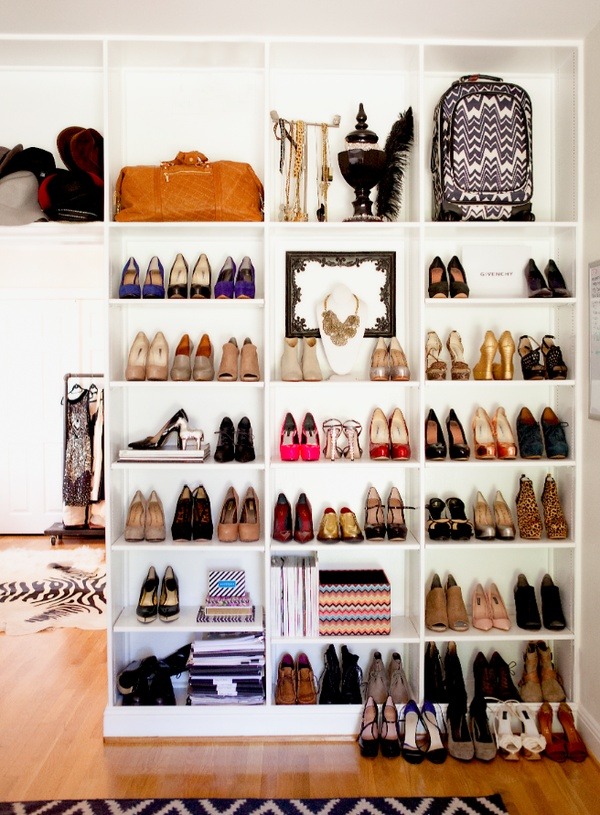
3. Floor-to-ceiling bookcases. This would be a dream! It would be nice to step back and 
see all of your shoes at once, too, so you could really see what you have to work with.
via

4. Lazy Susan Shoe Rack. This cracks me up, but it totally makes sense! This would
be perfect if you had a corner in your closet or bedroom to put this in.
via

5. Shoe Wheel. I would never use this, but it is a compact way to hold 
a good number of shoes. The things people come up with! 
via

6. Shoe Museum. This is my absolute favorite. I don't own enough glamorous shoes 
to show them off, but if you do, please create a shoe museum. My friend 
Colleen totally did this, and I'm super jealous.
via

Monday, March 25, 2013

Freezer Crockpot Meal: Chipotle Lime Chicken


I had seen this concept of "Freezer Crockpot" meals floating around Pinterest. A wonderful idea, really: dump a bunch of ingredients in some Ziploc bags, throw them in the freezer, dump contents into crockpot, and there's dinner! My first attempt did not go so smoothly, however.  One morning before work I allotted all of 2 minutes to empty my freezer bag into the crockpot and push "on". As you can see, my frozen block of chipotle lime chicken was slightly larger than my crockpot. Major fail. I could not get the lid of my crockpot on for the life of me! I was trying to run warm water over it, I was hacking at it with a knife, I was in a panic trying to get my "super easy and fast" dinner under control. FINALLY I was able to smush on my lid enough to leave the house and get to work (late, mind you). Lesson learned: thaw your bag in the fridge overnight!! That unfortunate morning aside, this dinner was SO good! It's so nice having a couple of back-up dinners in the freezer. Have you tried any freezer crockpot meals? Now that I know the system, I'm ready to try some more!

Chipotle Lime Chicken
1 large onion, diced
1 bunch of celery, diced (I actually used about 2/3)
8 boneless skinless chicken breasts
salt and pepper to taste
2 cans (15 oz) tomato sauce
1/2 cup lime juice
2 Tbsp minced chipotle chiles in adobo sauce
4 cloves garlic
1/2 cup cilantro (I omitted this)
2 cans (15 oz) black beans, drained
toppings of choice

Combine all ingredients except black beans and divide evenly between two freezer bags. Freeze.

When ready to cook, place one bag in the fridge overnight to slightly thaw. Empty contents of bag into crockpot and cook on low 8-10 hours. 30 minutes before serving, shred the chicken and add one can of drained black beans. Let simmer a little longer before serving. Serve with guacamole, shredded cheese, sour cream, and any other toppings of choice.

*Recipe makes two bags. Each bag serves 4-6*

source: recipe adapted from rhymes with smile

Friday, March 22, 2013

Last Weekend

Here it is Friday and I'm just getting around to posting about last weekend! This week Caleb and I have both been sick with colds + we've had a really busy week with work and life. Last weekend my parents came down to visit for the weekend, and my sister and her three kids also came up for a day. We had fun playing at the playground with the kids and also having adult conversation with my sister and parents. After my sister left on Saturday, we headed downtown with parents along with everyone else in town to enjoy the beautiful WARM weather! The park by the river was filled with picnics and people and it made me so excited for the arrival of spring. Sunday afternoon I even got a little touch of sunburn reading out on our back deck. Fast forward to the end of the week: we have frost on our cars, and we both have colds. BUT I'm holding onto last weekend as my hope for spring. Happy Friday!


Friday, March 15, 2013

Cream Cheese Pound Cake


What I love about pound cake is that the ingredients are always on hand; it's just a matter of taking 10 minutes to mix them together and throw it in the oven. A good pound cake is moist, and this one stayed moist even past the four days the recipe said it would. Top it with fresh fruit or fresh whipped cream, or have it plain with a hot cup of coffee, and you have a perfect dessert. Happy Friday! 

Cream Cheese Pound Cake
2 cups flour
1 1/2 tsp baking powder
1/2 tsp salt
1 (8 oz) package cream cheese, softened
3/4 cup unsalted butter, softened
1 1/2 cups sugar
2 tsp pure vanilla extract
4 eggs

Place a rack in the center of the oven and heat oven to 325 degrees. Grease and flour a 9x5-inch loaf pan. Set aside.

In a medium bowl, whisk together flour, baking powder, and salt. Set aside.

In the bowl of an electric stand mixer fitted with the paddle attachment, beat cream cheese until soft and pliable. Add butter and sugar and beat until fluffy, about 3 minutes. Add the vanilla and stir until blended. Add eggs one at a time, beating on medium for 1 minute after each addition. Stop the mixer and scrape down the sides of the bowl as necessary.

With the mixer on low, add the flour mixture and beat just until incorporated. Stop the mixer and finish folding together the batter with a spatula.

Spoon batter into prepared pan and bake for 30 minutes. After 30 minutes, check on the cake, rotate it, and move to an upper rack if it's browning too quickly.

Bake for another 30-35 minutes, or until a skewer inserted in the center of the cake comes out clean. Let cake cool in pan for 20 minutes before inverting onto a wire rack to cool completely. Cake will last, well wrapped, at room temperature for up to 4 days.

source: recipe from Joy the Baker Cookbook

Wednesday, March 13, 2013

Surprising Perfume Trick


I was flipping through How To Look Expensive last week (a great resource, by the way, for tried and true beauty tips and products) and found a surprising trick for lasting perfume. Instead of spraying perfume directly onto your skin or spraying a little in the air and twirling through it, spray the scent onto your hairbrush! "It'll cling to natural oils in your hair and make you smell delicious without overpowering," Aerin Lauder (granddaughter of Estée) shares. I tried it this morning, we'll see how it works:)

(image from here)

Monday, March 11, 2013

The Weekend

This past weekend we had to go to Virginia to work out some car issues, but the timing worked out perfectly so that we could visit our newest nephew! He was born last Tuesday, so was just a few days old when I finally got to cuddle with him:) Our visit was a pretty quick one, due to traffic and needing to get back home on Sunday, but we tried to make the most of it. We spent Saturday with my mom and my sister's family, holding the new baby and watching my other nephew and niece interact with their new baby brother. And of course I managed to grab a coffee from my favorite local coffee shop, and we continued the hunt for the perfect paint color (seriously! the hunt never ends!). Sunday before we left town we were able to see all of Caleb's family, which was a nice treat. Virginia weekends are always a whirlwind, but it was nice to be able to get a few things done and pack in seeing a bunch of people in such a short time. What did you do this past weekend?


Friday, March 8, 2013

Black Bean Chili


The weather around here has been crazy lately: snow flurries then blue skies, freezing mornings and warm afternoons...I'm just ready for spring to get here! Since we still have had quite a few chilly evenings, I made a batch of this black bean chili last week. It was SO good, and it honestly might become my go-to chili. The black beans make it extra filling (not to mention a little healthier!), and we've been eating this like crazy for the past week. Hope you have a fantastic weekend!

Black Bean Chili
3 (15 oz.) cans black beans
1 Tbsp olive oil
1 large onion, chopped
1 lb ground beef, cooked and drained
4 tsp chili powder
1 tsp ground cumin
1/2 tsp freshly ground pepper
1/4 tsp salt
1 1/2 cups chicken broth
3 (14.5 oz) cans petite diced tomatoes, any variety (the kind with green chiles or jalapenos are my favorite)
toppings: sour cream, shredded cheddar cheese, lime wedges, corn chips, cilantro

Rinse and drain 2 cans of black beans. Do not drain the third can.

Sauté chopped onion in heated olive oil in a large Dutch oven over medium heat 6 minutes. Add the cooked ground beef and cook another minute longer. Stir in the chili powder, cumin, pepper, and salt; sauté 1 minute. Stir in drained and undrained black beans, chicken broth, and diced tomatoes. Bring to a boil over medium-high heat; cover, reduce heat to low, and simmer 10 minutes. Serve chili with desired toppings.

source: recipe adapted from Southern Living, November 2007

Wednesday, March 6, 2013

Reading, Lately


I've made a little progress with my reading list for 2013 by finishing Les Misérables. I usually have a tough time getting into classics, but this one was really easy to read. I love the story but had never read the book, so I was glad to be able to read more details and immerse myself more fully into the story. Three other books that I've read this year and have really loved: Full DisclosureThe Lost WifeThe Last Runaway. All three books are very different, one is a mystery set in modern day, one is the heartbreaking story of a young couple during World War II, and the other is about a young Quaker who moves to America and begins helping slaves along the Underground Railroad. I'd highly recommend any of them. What have you been reading lately?

Monday, March 4, 2013

2013 Goal: Run a 10K


One of my goals for this year was to run a 10K. I'm not a runner, but the few times I've run consistently has been training for a race, so I knew this would be the main way to get my butt out the door running. I started training after New Year's (so cliché!), but I never worked up to the full 10K before race day. I had gotten up to 4 miles, but because I'm not disciplined and because I hurt my foot, I hadn't gone any further. Saturday was the race and I was pretty nervous, not knowing how my foot would feel after having not run for three weeks, and also never having run more than four miles in my life! It started snowing/raining as we were heading to the race, which was awesome (not). It only rained for the first little bit of the race, but it was still pretty cold! I was feeling pretty good up until the last mile, which was entirely uphill. I really wanted to run the whole thing and not stop and walk any of it, so I kept pushing myself. Caleb was cheering me on up the last hill (he had finished like 40 minutes earlier!), and I finally finished. I ran that race very slowly, but I actually ran the whole thing! I'm hoping this will help motivate me to keep running and being active, as that is the area in my life that I am the least disciplined. 

Have you accomplished any of your goals for this year?

Friday, March 1, 2013

Chocolate Chip Salted Caramel Cookie Bars


When we have out-of-town guests, I try to avoid spending my entire weekend in the kitchen (Caleb is constantly reminding me that people aren't visiting us for the food!), so that we can really just enjoy the people. I do a majority of the cooking and prep ahead of time, including dessert. The last two times we've had weekend guests, I've made these bars. They're a step up from regular chocolate chip cookies, but they're a cinch to throw together on a Thursday night before guests arrive. Plus, anything with salted caramel is a winner in my book. Happy Friday!

Chocolate Chip Salted Caramel Cookie Bars
2 1/8 cups flour
1/2 tsp salt
1/2 tsp baking soda
12 Tbsp unsalted butter, melted and cooled to room temperature
1 cup brown sugar
1/2 cup sugar
1 egg
1 egg yolk
2 tsp vanilla extract
2 cups chocolate chips
10 ounces caramel candy squares, unwrapped
3 Tbsp heavy cream
sea salt, for sprinkling over caramel and bars

Heat oven to 325 degrees. Spray a 2-quart baking pan (I used an 11x7 glass Pyrex dish) with nonstick cooking spray and set aside.

In a medium bowl, whisk together flour, salt, and baking soda. Set aside.

In the bowl of a stand mixer, mix the melted butter and sugars together until combined. Add the egg, egg yolk, and vanilla extract and mix until smooth. Slowly add the dry ingredients and mix on low, just until combined. Stir in the chocolate chips.

In a large microwave-safe bowl, combine the caramels and heavy cream. Microwave caramels on high until caramels are melted, stirring every 20 seconds. This will take about 2 minutes, depending on your microwave.

Divide the cookie dough in half. Press half of the cookie dough into the prepared pan, smoothing the top with the spatula. Pour hot caramel over the cookie dough. Sprinkle caramel with sea salt. Drop spoonfuls of cookie dough over the caramel and spread dough with a spatula until the caramel is covered. Sprinkle the bars with additional sea salt.

Bake cookie bars for 30 minutes or until the top of the bars are light golden brown and the edges start to pull away from the pan. Cool bars on a wire rack to room temperature. Cut bars into squares and serve.

source: recipe from two peas and their pod