Friday, March 30, 2012

Book Review & Giveaway


I recently read Illusion, the newest book by bestselling author Frank Peretti.  Frank Peretti has written a bunch of books but this is the first that I've actually read by him.  If you're into books that are a little outside the scope of reality (and these days, who isn't? i.e. Twilight, Harry Potter, Hunger Games), then you would probably enjoy this book.

The book is a love story of couple with a popular magic act.  At the very beginning of the book, the wife is killed in a car accident, but she wakes up as her 19 year-old self living in the present.  She realizes she is able to travel through time and space, and ends up in the same town as her grieving husband.  The book details their interactions, at first neither realizing who the other is.  I don't want to give any spoilers, but the book is pretty intriguing and keeps you guessing!

The publisher who provided me with the book to review also gave me another copy to giveaway.  So, leave a comment on this post to be entered to win a copy of Illusion!  The winner will be randomly selected and announced April 9.  U.S. mailing addresses only, please.

Thursday, March 29, 2012

5 Things I Want to Hang From My Ceiling

1. Marshmallows.  180 strands of marshmallows over a table?!  I love the whimsy of it. 


2. A DIY Nepali Hanging. What pretty colors!


3. Colored Poofs & Poms.  So pretty!  I love this for a baby's room especially.


4. Books.  This would be perfect in a little study or library. 


5. Ribbons.  This is so simple but look how stunning!


Happy Thursday!

Tuesday, March 27, 2012

Salted Caramel Mocha


It's been feeling like summer weather here lately, so when I do drink coffee these days I prefer it to be iced.  But there's been a few rainy days here and there that made me crave a warm cup of coffee--and I turned to this homemade salted caramel mocha.  I have to say that I prefer the homemade version to Starbuck's; I thought the Starbuck's one had a funny aftertaste that I didn't quite care for.  This one is easy to make and a perfect addition to any rainy afternoon.

Salted Caramel Mocha
2 Tbsp caramel sauce (I used this)
1 Tbsp chocolate syrup
small pinch fleur de sel
2/3 cup strong brewed hot coffee
1/3 cup milk, warmed
whipped cream, for serving
additional caramel sauce, for serving

Add the caramel sauce, chocolate syrup, and salt to a mug.  Pour the hot coffee into the mug and stir well until the caramel and chocolate are mixed in.  Stir in the milk.  Adjust flavorings to taste.  Top with whipped cream and additional drizzle of caramel sauce, if desired.

source:  recipe from annie's eats

Monday, March 26, 2012

OXO Product Review & Giveaway!


When I made these muffins this past weekend, I was able to use my new OXO food scale!  I've been wanting a food scale for a long time and was so excited that OXO sent me two food scales: one to review and one to give away to one of you!

Having a scale in my kitchen has been so useful.  I can finally weigh my chocolate to get the exact amount a recipe calls for, I've been able to weigh my fresh veggies for each recipe, and now I can finally cook from some of my cookbooks that only list the ingredients by weight!  A food scale is also really helpful if you're trying to watch what you eat and are weighing your protein, etc.  


I really like that this scale is digital with numbers that are large enough to read easily.  Another handy feature of the OXO food scale is that the display unit can pull out so you're still able to read it when you're measuring large objects. Also that little rectangle on the right side of the display lets you know how much capacity is left on the scale.  I've been really pleased with this scale, and with how little room it takes up on my counter!

And now to the good part - an OXO 5 lb food scale for one of you!  To enter, please leave a comment on this post - any comment!  If you are a GFC follower of this blog you may leave an additional comment saying so.  Winner will be chosen randomly and announced Tuesday, April 3.  Limited to those with a U.S. mailing address, please.


Disclosure:  I received two food scales from OXO for free to review as a part of the OXO Blogger Outreach program.  However, the opinions stated above are my own.

Thursday, March 22, 2012

A Green Smoothie That Actually Tastes Good


I'm the kind of girl who likes to eat french toast or banana bread with bourbon and chocolate for breakfast.  When I'm feeling healthy I'll make a fruit and yogurt parfait, but that's about as healthy as I get first thing in the morning.  I made a green smoothie with kale in it once in my life, and I promptly dumped it down the kitchen sink.  But this week I decided it was time to give it another go, so I tried this green smoothie that Joy the Baker swears doesn't taste like spinach and kale. And it doesn't!  This smoothie is so delicious, and coming from someone who considers chocolate and legitimate breakfast food, you know it has to be good.  I've eaten this for breakfast every day this week, and it fills me up and tastes yummy.  I'm a green smoothie convert!

Kale Spinach Banana Peanut Butter Smoothie
1/2 cup chopped kale leaves
1/2 cup chopped spinach leaves, thick stems removed
1/2 cup milk
1/4 cup vanilla yogurt
1 frozen banana, cut into 2-inch chunks
1 Tbsp ground flax seed
1 tsp honey
1 1/2 Tbsp peanut butter

In a blender, mix kale, spinach, milk and yogurt until no large green pieces remain.  Stop blender and add banana. Mix until incorporated.  Stop blender and add flax seed, honey, and peanut butter. Blend until thoroughly combined.

source:  recipe adapted from Joy the Baker Cookbook

Wednesday, March 21, 2012

Read: Is Everyone Hanging Out Without Me?


I finished reading Is Everyone Hanging Out Without Me? last night.  I have to admit that I had super-high expectations after everything I had heard about it.  The first few chapters I was unimpressed--I kept waiting to burst out laughing and pee my pants because it was just that funny.  Then I forgot about all the hype and my expectations, and I just read it.  And I enjoyed it, and it WAS funny!  Mindy Kaling has some pretty spot-on opinions and observations about life, and it was a fun read.  I've heard that Bossypants is better and funnier, but I haven't read that so I can't make a comparison.  But I would recommend reading this one if you're looking for a fun or light read - perfect for a spring day relaxing in the park or laying on the beach this summer!

Have you read anything good lately?

Monday, March 19, 2012

Spiced Chicken with Couscous Salad


On the list of things that make me happy, somewhere between falling asleep to the sound of rain and paying for something with exact change, is a colorful plate of food.  I just love the way the basil and the snap peas contrast with the bright red of the tomatoes in this couscous salad.  This is one of the easiest dinners to make and it was super flavorful due to all of the fresh ingredients.  We spent yesterday afternoon laying by the pool and came home to have this for dinner -- it felt like a summer day.  Happy Monday!  

Spiced Chicken with Couscous Salad
3 Tbsp olive oil
4 boneless, skinless chicken breasts (I cut mine in half so they would cook faster)
1 Tbsp paprika
2 tsp ground cumin
salt and freshly ground pepper
3/4 cup couscous
3/4 pound cherry or grape tomatoes, halved
1/4 pound snap peas, thinly sliced crosswise
1/2 cup torn fresh basil
1/2 tsp grated lemon zest
2 Tbsp fresh lemon juice

Heat 1 Tbsp of the olive oil in a large skillet over medium heat.  Combine the paprika, cumin, 1/2 tsp salt, and 1/4 tsp pepper in a small bowl and stir to combine.  Place each chicken breast half in the seasonings and turn to coat.  Cook chicken until browned and cooked through, about 6-7 minutes per side.  Transfer to a cutting board.

Meanwhile, place the couscous in a large bowl.  Add 1 cup hot tap water, cover, and let sit for 5 minutes; fluff with a fork.  Add the tomatoes, snap peas, basil, lemon zest, lemon juice, the remaining 2 Tbsp of olive oil, 1/2 tsp salt, and 1/4 tsp pepper and toss to combine.

Slice the chicken and serve over the couscous.

source:  recipe from Real Simple, June 2010

Friday, March 16, 2012

Brown Butter Chocolate Chip Cookies


What I love about chocolate chip cookies is that they're perfect in any situation.

Eat them fresh out of the oven on a Sunday night with your husband.  It doesn't matter if it spoils your dinner. Chocolate chip cookies for dinner is totally acceptable.

Eat them while you watch the finale of The Bachelor.  It's okay that Ben picked Courtney...because you have chocolate chip cookies in your hand.

Take them to work and give them to your co-workers.  You don't need three dozen cookies for yourself!  Cookies taste better when you share them.

But on Thursday night when there's only one cookie left, it's okay to be just a little selfish and finish it off yourself.

Brown Butter Chocolate Chip Cookies
1 cup (2 sticks) plus 1 Tbsp unsalted butter, softened to room temperature
1 cup sugar
1 1/2 tsp pure vanilla extract
1 tsp molasses
1/2 cup packed light brown sugar
1 large egg
1 large egg yolk
2 1/4 cups flour
1 tsp salt
1 tsp baking soda
1 cup semisweet chocolate chips

Brown 1 stick plus 1 Tbsp butter:  place butter in a medium-sized saucepan or skillet over medium heat.  Allow butter to melt.  Once completely melted, the butter may foam and froth as it cooks.  Swirl the pan as it is cooking.  Once the crackling subsides, keep an eye on the butter; it will begin to brown quickly.  The butter will smell rich and nutty as it browns.  Once the butter solids reach a rich chestnut color, remove the pan from the heat and immediately transfer the butter to a small container and allow to cool slightly.

In the bowl of a stand mixer fitted with a paddle attachment, cream the remaining 1 stick of butter and the sugar. Cream on medium speed until light and fluffy, 3-5 minutes.  Add the vanilla extract and molasses, and beat until incorporated.  Once the brown butter has cooled slightly, pour into the creamed butter mixture, along with the brown sugar.  Cream for about 2 minutes until well incorporated.  Add the egg and egg yolk, and beat for 1 more minute.

In a medium bowl, whisk together flour, salt, and baking soda.  Add the flour mixture, all at once, to the butter mixture and beat on low speed until the flour is just incorporated.  Remove the bowl from the stand mixer and fold in the chocolate chips with a spatula.  Cover the bowl with plastic wrap and allow to chill in the refrigerator for 30 minutes.

Heat the oven to 375 degrees.  Place racks in the upper third and middle of the oven.  Line 2 baking sheets with parchment paper.  Using a cookie dough scoop or a spoon, roll the dough into balls and space about 2 inches apart on the baking sheet.  Bake cookies for 12-14 minutes until lightly browned on the outside, but still soft and tender in the center, rotating sheets halfway through baking.  Remove from the oven and allow to rest for 5 minutes on the baking sheet before removing to a cooling rack.  Makes 2-3 dozen cookies.

source:  recipe adapted from Joy the Baker Cookbook

Thursday, March 15, 2012

5 Things on My Mind Right Now

Is Everyone Hanging Out Without Me?  This is sitting on my nightstand 
and I can't wait to read it!  I've heard such good things about this book!


Nine West Garner Wedges.  I need a pair of nude wedges.  Thoughts on these?


Chewy Irish-Coffee Blondie Bars.  I want these in my belly!


Laying by the pool.  If this weather keeps up you can 
find me at the pool this weekend!  I desperately need a tan!


The Hunger Games.  I haven't read the books yet....should I see the movie?   
Should I spend all weekend reading the books to prepare for next week?


What's on your mind today?  Happy Thursday!

Tuesday, March 13, 2012

Creamy Stovetop Mac & Cheese


My obsession with trying different mac & cheese recipes will never end.  I love finding new varieties - especially when they're super easy to make.  This version is probably the simplest yet: you don't have to make a roux AND there's no waiting time while it's in the oven!  We had this for dinner last week with Pioneer Woman's BBQ Comfort Meatballs - it was the ultimate comfort food dinner.  Also, feel free to sub in any kinds of cheese you want - the possibilities are endless!

Creamy Stovetop Mac & Cheese
12 oz. dried pasta
2 cloves garlic, minced
10 oz sharp cheddar cheese, shredded
1/4 cup milk, half and half, or heavy cream
4 oz low-fat Greek yogurt
3 Tbsp unsalted butter, at room temperature
salt and pepper, to taste

Bring a large pot of water to boil.  Cook pasta according to package directions just until al dente.  Drain well, reserving 1 cup of the pasta water.

Immediately return the pasta to the pot.  Add the garlic and cheese and stir briefly to combine.  Mix in the milk, Greek yogurt, and butter and stir until the cheese is thoroughly melted and the mixture is creamy.  If necessary add a small amount of the reserved pasta water to adjust the consistency.  Season to taste with salt and pepper.  Serve immediately.

source: adapted from annie's eats, originally from Macaroni and Cheese by Marlena Spieler

Monday, March 12, 2012

Feeling Happy

Happy Monday!  How was your weekend?  We had a good weekend and I feel ready for the new week to begin.  I've been feeling so happy lately!  I'm really happy at my new job, we love our church, we've been having wonderful spring weather.  I just feel like we're in a really good place in our life and I'm so thankful!  Here are some other little things that have been making me happy lately, too.

{cute Andy Warhol notecards that feel like spring}

{reading Sophie Kinsella's newest book}

{girl scout cookies}

{new Baggu to pack my lunch in}

{flowers from my sweet husband}

What has been making you happy lately?

Friday, March 9, 2012

Southwestern Stuffed Peppers


One of our favorite dinners around here is stuffed peppers, a recipe passed down from my grandmother, tweaked a litte by my mom, and then tweaked a little further by me.  I saw this recipe for southwestern stuffed peppers in a Real Simple magazine and knew I had to try them.  We loved this southwestern version!  Bonus:  you can make and assemble the peppers up to 12 hours in advance, cover them and stick them in the fridge, and just add 5-10 minutes of baking time.  Hello easy weeknight dinner!

Southwestern Stuffed Peppers
1 cup long-grain white rice
1 Tbsp olive oil
6 scallions, thinly sliced, white and green parts separated
1 lb ground beef chuck
1 cup corn kernels
1 (4.5 oz) can chopped green chilies
1 tsp ground cumin
4 oz Monterey Jack, grated (1 cup)
salt and black pepper
6 large bell peppers, halved lengthwise, ribs and seeds removed
sour cream and salsa for serving

Heat oven to 375 degrees.  Cook the rice according to the package directions.

Heat the oil in a large skillet over medium-high heat.  Add the scallion whites and beef and cook, breaking the beef up with a spoon, until no longer pink, 3-5 minutes.  Stir in the corn, chilies, cumin, cooked rice, 1/2 cup of the Monterey Jack, 1/2 tsp salt, and 1/4 tsp black pepper.

Arrange the bell peppers, cut-side up, in a 9x13-inch baking dish or pan (may need to use an additional pan if peppers don't fit).  Divide the beef mixture among the bell peppers, add 1/2 cup water to the dish, tightly cover the dish with foil, and bake until the bell peppers are soft, 30-40 minutes.  Uncover, sprinkle with the remaining 1/2 cup of Monterey Jack, and bake until browned, 5-7 minutes more.  

Top with salsa, sour cream, and scallion greens if desired.

source:  recipe from Real Simple, February 2012

Thursday, March 8, 2012

Organize: Your Spice Cabinet


My spice cabinet was in desperate need of organization.  It had gotten to the point that I couldn't even see what anything was and every time I wanted to use a spice I had to take everything else out too.  It was driving me crazy so I intervened; now reaching for my spices is no longer irritating!  In case I'm not the only one with a messy spice cabinet, here are some tips to a user-friendly spice stash:

1. Don't buy a pre-filled spice carousel/rack.  You might not even use all of the spices on it, it will take up a bunch of room on your countertop, and you don't know how long those spices have been sitting in that box (ick!).

2. Utilize all of the space you have.  I use these magnetic spice tins that stack on top of each other so I can fit all of my spices into my tiny cabinet.  I like having most of my spices in uniform containers, and I also like that they're easy to refill. 

3. Make sure you're able to see each of your spice jars or containers.  Jillian inspired me to get this non-skid turntable, and now I can actually see what's in my cabinet!  I got the size that fits in my cabinet and is still able to spin, but also leaves a little room on the side for other things. 

4. Clearly label your spices.  I printed these labels onto adhesive paper and stuck them on my tins.  With a quick glance I can see what I need to grab.  I also organized my spices alphabetically so I would know exactly where each one was. It might be more helpful for you to organize them by which spices you use most frequently. 

5. Remove doubles and store them somewhere else.  I had back-ups of several different spices that were just cluttering my cabinet.  I made sure all of my tins were filled and then stuck my extras in the pantry where they're not in the way.

I hope these ideas help get you started on a more organized spice cabinet! 

Wednesday, March 7, 2012

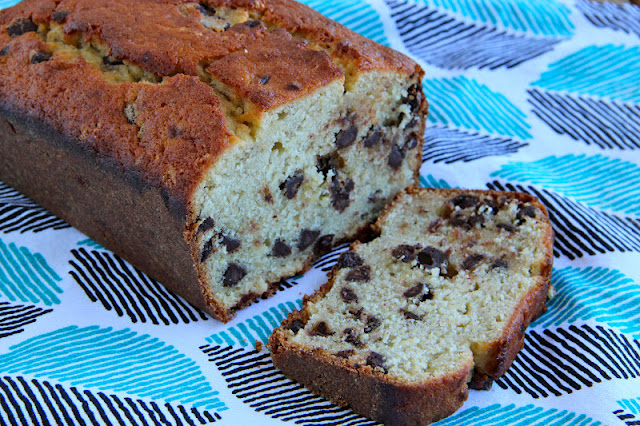
Chocolate Bourbon-Spiked Banana Bread


I've spent lots of time in my kitchen making banana bread.  I've added zucchini and loaded it with chocolate, I've mixed in cream cheese, and even thrown in caramel too.  But never have I ever added bourbon to my banana bread. And I've been missing out!  This is the first recipe I've made from the (newly published) Joy the Baker Cookbook and it was amazing!  The bourbon adds this wonderful extra flavor that I never knew banana bread was missing. 

Chocolate Bourbon-Spiked Banana Bread
2 cups flour
3 tsp baking powder
1/2 tsp salt
1/2 cup (1 stick) unsalted butter, softened 
1 cup sugar
2 eggs
1 1/2 cups mashed ripe bananas (about 3)
1 tsp lemon juice
3 Tbsp bourbon
1 cup coarsely chopped walnuts (I omitted these)
1 cup (6 ounces) semisweet chocolate chips

Place a rack in the center of the oven and heat to 350 degrees.  Grease and flour an 8x4 or 9x5-inch loaf pan.  Set aside.

In a medium bowl, sift together flour, baking powder, and salt.

In the bowl of an electric stand mixer fitted with a paddle attachment, beat butter and sugar until light and fluffy, 3-5 minutes.  Add eggs one at a time, beating for 1 minute between each addition.  Stop the mixer, scrape down the sides of the bowl and add bananas, lemon juice, and bourbon.  Beat until well incorporated.

Turn the mixer to low and add the flour mixture all at once.  Beat until almost incorporated.  Stop the mixer and remove the bowl from the mixer.  Add the walnuts and chocolate chips and incorporate the rest of the ingredients with a spatula.

Spoon the mixture into the loaf pan.  Bake for 45 minutes to 1 hour, or until a skewer inserted in the center of the loaf comes out clean.  Remove from the oven and allow loaf to cool in the pan for 20 minutes before inverting onto a wire rack to cool completely.  Bread will keep for up to 5 days, well wrapped, at room temperature.

source:  recipe from Joy the Baker Cookbook

Tuesday, March 6, 2012

10 Fun Lights to Brighten Your Space

An easy way to make a statement in a room is with a unique lamp or light fixture.  Stores like Anthropologie and Restoration Hardware have some amazing lighting selections if you have the budget for them, or you can always browse pinterest for a cheaper DIY.  I rounded up a few of my favorites of each below.     


Monday, March 5, 2012

Croissant French Toast


This past weekend I had the sudden urge to make French toast for breakfast.  I'll usually take pancakes over French toast any day, but I really wanted some French toast made with croissants.  We don't go to church until 10:45 on Sunday morning, so I was able to get up in enough time to make us a breakfast of French toast before church.  I loved that the croissants made this French toast a little lighter and airier, and it was the perfect start to our Sunday.

Croissant French Toast
5 large eggs
1 cup half-and-half
1 Tbsp sugar
1 tsp ground cinnamon
1/4 tsp finely grated orange zest
4 croissants, split horizontally
1 Tbsp unsalted butter, melted

Whisk eggs, half-and-half, sugar, cinnamon, and orange zest in a large bowl to blend.  Add croissants to egg mixture; turn to coat evenly on both sides.

Heat a griddle or large skillet over medium-low heat.  Brush with melted butter.  Lift croissants from batter, allowing excess to drip back into bowl.  Cook croissants on griddle until browned on both sides and just cooked through, about 5 minutes per side.  Place 2 halves on each plate and serve with toppings of choice.  Makes 4 servings.

source:  recipe adapted from Bon Appétit, December 2011

Friday, March 2, 2012

Eclair Cake


Caleb isn't a big cake person, so this year instead of a birthday cake he requested this eclair cake.  My mom has been making this dessert since I was little, and I love it.  It doesn't take long to make it, but because it has to chill for at least 8 hours, it's perfect for putting together in the morning, sticking it in the fridge, and forgetting about it until after dinner.

Eclair Cake
1 (14-16 oz) box of whole graham crackers
2 packages instant vanilla pudding
3 cups cold milk
1 (8 oz) tub of Cool Whip, thawed

for the topping
1 cup sugar
1 stick butter
1/3 cup milk
1/2 cup chocolate chips

Add the milk to the two packages of vanilla pudding.  Whisk by hand several minutes, until pudding thickens up.  Fold in the Cool Whip.  In a 9x13 pan, place enough of the graham crackers to cover the bottom of the pan.  Layer half of the pudding mixture on top, then add another layer of graham crackers.  Spread the remaining pudding over the graham crackers, and top with another layer of graham crackers.

To make the topping, in a small saucepan combine sugar, butter, and milk.  Stir constantly.  Bring to a boil and boil for one minute.  Remove from heat and stir in the chocolate chips until melted and smooth.  Spoon chocolate topping over the top layer of graham crackers.  Cover and refrigerate at least 8 hours.  Serves 12.

source:  recipe from my mom

Thursday, March 1, 2012

March: Aim Higher

via

I can't believe it's already March!  Where is 2012 going?!  I'm plugging right along through my happiness project and it's time to make my goals for March!

The March chapter in The Happiness Project is all about work, which is quite appropriate because I started a new job on Monday!  It's going well so far and I think I'm really going to like it.  Yesterday was my last day of my other job, so the beginning of this week was really busy trying to juggle both jobs!  It will be nice to be able to focus entirely on my new job and get used to that adjustment.  My goals for March are:

1. Learn my new job, obviously.  This is an entirely new field of work for me so I have a lot to learn.  I had been doing my other job for six years, so it's been a while since I've had to start fresh and learn a new company, etc.  I do love learning new things and I like a challenge, so I've enjoyed this big change.  I don't really know what specific goals to make yet since today is only day #4.  But I'm hoping that this month will be a month of learning and feeling comfortable with my new responsibilities.

2. Manage my time well.  I am used to working from home where I can juggle my work schedule between errands and making dinner and doing laundry.  Going into work and being in an office all day has been the biggest adjustment for me.  I need to re-figure my cooking, cleaning, keeping up with the house, and blogging schedules.  I don't want to give anything up so I'm going to need to use my time wisely and not waste any.

3. Get to know my co-workers.  I really like everyone I'm working with, which is such a blessing. I want to get to know them better and feel like I'm contributing to the positive work atmosphere we have going on.