Monday, June 24, 2013

Easy Summer Treat: Strawberry-Yogurt Popsicles


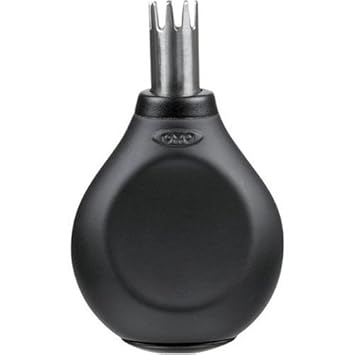
Since picking strawberries over Memorial Day weekend, I have been whipping up all kinds of strawberry treats in the kitchen: strawberry cheesecake ice creamstrawberry basil lemonade, several batches of strawberry jam, and also these popsicles. I always bake a good bit with the strawberries we pick, but this year the biggest difference has been having a strawberry huller! This little tool is seriously a miracle-worker: you just plunge it in the top of the berry to pull out the leaves and the hull all at once. It's much more efficient than digging around inside the strawberry with a paring knife, and you also don't lose the entire top one-third of the strawberry if you go the lazy route of just whacking it off with the knife (I've been guilty of this). This little tool has made cooking+baking with strawberries so much easier, and I don't know how I've gone the past few years of making jam without it! You can get yours here.


Now, for the popsicles: I hesitate to call this a recipe, because it's really not. I hulled and chopped a bunch of strawberries and then mashed them up with a potato masher. I then layered vanilla yogurt and the strawberries into the popsicle molds and froze them overnight. It's seriously the easiest thing, and it's so refreshing for a summer treat. Since you don't add sugar or anything to the strawberries, this is also a really good healthy snack for kids! They will feel like they are eating dessert because it's a) frozen and b) on a stick, but it's just fruit+yogurt :)

Disclosure: I received the OXO strawberry huller free from the OXO Blogger Outreach Program, but the above opinions are 100% my own. OXO is a brand I have always used and one that I really love.

Friday, June 21, 2013

Happy Summer!

It's officially summer and I couldn't be happier! Summer is my favorite but it always seems to slip away too quickly, so this is my list for embracing every moment and enjoying the season!


Friday, June 14, 2013

Old-Fashioned Blueberry Coffee Cake


Last week Caleb came home from work with a bunch of fresh blueberries from a co-worker. I've had my eye on this recipe for months now, so I decided I would use the berries to make this coffee cake. I put it together last Friday night after work, so that Saturday morning we had a delicious breakfast waiting for us. I love coffee cakes that have a good crumb topping, and the moist cake and the fresh berries really took this coffee cake over the top. Have a great weekend!

Old-Fashioned Blueberry Coffee Cake
crumb topping:
1/2 cup flour
1/4 cup + 2 Tbsp packed light brown sugar
1/2 tsp salt
1/4 cup pecans, chopped
3 Tbsp chilled unsalted butter, cut into 1/4" cubes

cake:
1 1/2 cups + 1 Tbsp flour, divided
1 Tbsp cornmeal
1/2 tsp baking powder
1/2 tsp baking soda
1/4 tsp salt
3/4 cup + 3 Tbsp sugar, divided
6 Tbsp (3/4 stick) unsalted butter, room temperature
1/2 tsp vanilla extract
2 eggs
1 cup buttermilk
1 Tbsp ground cinnamon
2 cups fresh blueberries

Crumb Topping: Whisk flour, sugar, and salt in a medium bowl. Stir in nuts. Add butter; with a pastry blender work butter into dry ingredients until large, moist crumbs begin to form. Set topping aside.

Cake: Heat oven to 350 degrees. Coat 9x9 metal pan with nonstick spray. Line bottom with parchment paper; set aside. Whisk flour, cornmeal, baking powder, baking soda, and salt in a medium bowl; set aside.

Using an electric mixer on medium speed, beat 3/4 cup sugar and butter in a medium bowl until light and fluffy, 3-4 minutes. Beat in vanilla. Add eggs one at a time, beating to blend between additions and occasionally scraping down sides of bowl, until mixture is pale and fluffy, 3-4 minutes longer.

With mixer on low speed, add dry ingredients to bowl in 3 additions, alternating with buttermilk in two additions, beginning and ending with dry ingredients. Pour half of batter into prepared pan and smooth top. Whisk remaining 3 Tbsp sugar and cinnamon in a small bowl; sprinkle evenly over batter in pan. Spoon remaining batter over; smooth top.

Toss blueberries with 1 Tbsp four in a small bowl; scatter evenly over batter. Sprinkle crumb topping over blueberries.

Bake cake until top is golden brown and a tester inserted into the center comes out clean, 55-65 minutes. Let cool completely in pan. Store airtight at room temperature. Serves 8-12.

source: recipe adapted from Bon Appétit, September 2012

Wednesday, June 12, 2013

Gold Leaf DIYs

Lately I've found that I've been drawn to all things gold leaf. In particular I'm a fan of all of the fun gold leaf DIYs I've seen floating around on Pinterest and various blogs. Have you attempted any projects with gold leaf? Here are a few of my favorites:


Friday, June 7, 2013

Strawberry Basil Lemonade


After sharing all of those lemonade variations last week, I was seriously craving some good homemade lemonade over the weekend. That in addition to our AC blowing out (another story for another time), it was a perfect time to have a glass (and another and another) of lemonade. I threw in some strawberries we had picked and some of the basil that's growing (yay!) in my mini-herb garden. I loved the combination! Hope your weekend is cool + filled with fruity drinks.

Strawberry Basil Lemonade
3/4 cup sugar
1 1/2 cups fresh lemon juice (from about 8 lemons)
2 cups sliced strawberries
fresh basil

In a small saucepan, combine the sugar and 3/4 cup water. Bring to a boil, stirring occasionally, until the sugar is dissolved; let cool. In a pitcher, combine the syrup with the lemon juice and 4 cups of water. Stir well to combine. Add the sliced strawberries and a handful of fresh basil. Serve over ice. *Note: the longer this lemonade sits, the better it tastes as the basil infuses the drink!

source: recipe adapted from real simple + a beautiful mess

Wednesday, June 5, 2013

Hammocks

via

via

via

via

I'm dreaming of a hammock for our backyard. We have two perfect trees; now we just need to find the perfect hammock! I've always wanted a hammock in my backyard, for reading in the cool evenings and for sipping on lemonade in the afternoons. I'm so excited that we're actually going to get one! I'm on the hunt for a good one - I just can't decide if I want it to be woven or not, colorful or white. What do you think?

Monday, June 3, 2013

Strawberry Cheesecake Ice Cream


After we picked all of those strawberries the other weekend, I knew I wanted to make some sort of ice cream. Last summer I made strawberry ice cream (so fresh!), but I had strawberry cheesecake ice cream on my mind this year. It took me a while to find a recipe that looked good, particularly because I wanted the graham cracker crust pieces. I even started making one recipe that totally flopped, but I was determined so I turned to this recipe. The custard was pretty basic and is very creamy, then you just add the cream cheese, strawberry, and graham cracker crust pieces. With the right ice cream maker, homemade ice cream is really a cinch to throw together for an easy summer dessert. Happy Monday!

Strawberry Cheesecake Ice Cream
for the ice cream:
1 cup heavy cream
1 cup milk
1/4 cup sugar
2 egg yolks, beaten
1 tsp vanilla extract
1 cup chopped strawberries
2 oz cream cheese, cubed
1/4 cup crumbled graham cracker crust

Heat the cream, milk, and sugar in a saucepan until it almost boils, about 5 minutes. Reduce the heat to low. Add 1 Tbsp of the cream mixture to the egg yolks to temper them. Add the egg mixture to the saucepan and stir quickly to combine. Cook at low heat until it thickens and can coat the beack of a spoon. Remove from the heat and stir in the vanilla extract. Cover custard and chill in the fridge overnight. Start freezing according to your ice cream maker's instructions. About halfway through, add the strawberries, cream cheese, and graham cracker crust crumbs. Freeze until ready to serve.

for the graham cracker crust:
1/4 cup graham cracker crumbs
1/2 Tbsp sugar
1 Tbsp butter, melted

Mix everything together in a small bowl. Press the mixture onto the bottom of a small baking pan. Bake at 350 until golden brown, about 10-15 minutes. Let cool completely.

source: recipe from closet cooking