Friday, January 13, 2012

The Little Things

This week seemed so incredibly long!  It was mostly due to the fact that Caleb was traveling for work this week, a situation I was less than thrilled about.  Instead of moping and feeling lonely, I got my butt into gear and got so much done!  I've learned over and over again that it's my attitude in response to life's circumstances that really makes the difference.  Here are some little things I chose to find happiness in this week.

{cute post-its to brighten my to-do list}

{delicious soup for my lunches: recipe here}

{getting my craft on with multi-surface paint}

{daisies to combat the dreary weather outside}

{catching up on holiday thank you notes}

What little things brightened your week?

Thursday, January 12, 2012

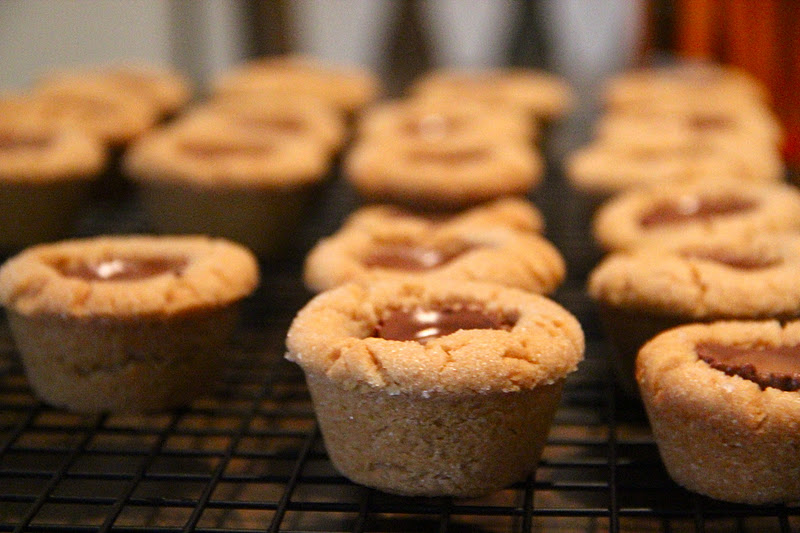
Peanut Butter Cup Cookies


Peanut butter and chocolate were meant to go together, and that's all there is to it.  Instead of making the traditional peanut butter cookies with the Hershey's kiss on top, we made the same dough but pressed a Reese's cup in the center of the dough before baking.  We think these are definitely the better version of the two!

Peanut Butter Cup Cookies
1 1/2 cups flour
3/4 tsp baking soda
1/2 tsp salt
1/2 cup unsalted butter, slightly softened
1 cup peanut butter
1 cup sugar
1 egg
2 tsp vanilla
1 bag of Reese's peanut butter cups

Preheat oven to 350 degrees.  Place bag of Reese's peanut butter cups in freezer until ready to use (this allows the wrappers to come off clean).  Sift flour, baking soda, and salt with a wire whisk and set aside.  Beat butter and peanut butter.  Add sugar and beat until fluffy.  Add egg and vanilla.  Add flour mixture and combine.  Roll dough into 1 to 1-1/2 inch balls and then roll the balls in granulated sugar to coat.

Press rolled balls into greased cavities of a mini muffin tin.  Press an unwrapped Reese's peanut butter cup into each. Bake at 350 degrees for 8-10 minutes.  Let cool in pans for 5-10 minutes.  Remove from pans and allow to finish cooling in wire racks.  Makes 2-3 dozen cookies.

source:  recipe from bakerella

Wednesday, January 11, 2012

DIY Nail Polish Rack


A while ago I saw an idea on pinterest to turn an old spice rack into a rack for nail polish - brilliant, right?  So for about eight months whenever I went thrifting I looked for an old spice rack.  FINALLY I found one!  When we were at my parents' house over Christmas, we took it apart, sanded it, and painted it.  (This was a joint effort of my sister Kristin and her husband Matt, Caleb, and myself.  But honestly Caleb did most of the work.)  I am so happy with how it turned out! 

To make your own nail polish rack, you will need:
- a spice rack (I got mine for $2.50 at Goodwill)
- sand paper
- primer
- spray paint 

Hello ugly spice rack!

Sand the entire spice rack.  

Spray on primer & spray paint, following directions on cans.  
And try not to stand as awkwardly as I am.

Finished product!

Tuesday, January 10, 2012

Fruit & Yogurt Parfait with Homemade Granola


In an effort to keep my goal of eating breakfast, I've had to make breakfasts that I'm actually interested in eating. Lately I've been making a fruit and yogurt parfait with homemade granola.  In a mini trifle dish or small bowl, layer vanilla yogurt, granola, and a fresh fruit of your choice.  Repeat the yogurt and granola layers and top with more fresh fruit.  I like to use bananas, blueberries, and strawberries.  The star of this parfait, though, is the homemade granola.

Homemade Granola
4 cups old fashioned oats*
1 cup finely chopped almonds
1 cup finely chopped walnuts
1/2 cup sweetened shredded coconut
1 tsp cinnamon
1/2 tsp salt
3 Tbsp butter
1/4 cup vegetable oil
1/4 cup honey
1/2 cup brown sugar
1 tsp pure vanilla extract

Heat oven to 325 degrees.  Line two baking sheets with parchment paper and set aside.

Whisk together oats, almonds, walnuts, coconut, cinnamon and salt.  Set aside.

In medium saucepan over medium heat, melt together butter, oil, honey, and brown sugar until the sugar is dissolved and the mixture begins to boil.  Carefully whisk together so it's well incorporated.  Remove from heat and add the vanilla extract.  Pour the warm mixture over the oat mixture and toss together with a wooden spoon.  Make sure all of the oat mixture gets moistened by the sugar mixture.

Spread mixture onto prepared baking sheets and place on the top two racks of the oven.  Bake at 325 degrees for 25-30 minutes, removing from oven and tossing oats on pan twice during baking.  To ensure even baking and prevent any burning, rotate the pans halfway through baking.  After removing from oven, let the granola cool on pans before storing in an airtight container.  Keeps for two weeks.

*Make sure you use old fashioned oats.  Using quick oats will make your granola sandy instead of crunchy.  Plus old fashioned or steel-cut oats are healthier!

Source:  granola recipe adapted from joy the baker

Monday, January 9, 2012

January: Boost Energy

via

One of my goals for the year is to read through The Happiness Project and work on the 12 areas specified in the book. I won't always make the same goals that are in each chapter; rather, I'm going to use the principles and research from the chapter to help me make goals for myself.

January is about boosting energy, both physically and mentally.  I thought about the times during the day I feel the least energetic and the things that seem to suck the energy out of me.  Then I turned those around and made a list to prevent my most common energy-drainers.

1. Decrease caffeine.  I've eliminated my morning cup of coffee.  This may seem counter-intuitive, but I'm willing to feel a little draggy for a the first few days so that in the long run I'm not so dependent on caffeine for my energy.

2. Eat breakfast.  I usually skip breakfast because I'm either drinking coffee or nothing sounds good to me, but then by late morning I'm so hungry I can barely think straight.  Just a little breakfast each day will hopefully give me enough energy to work efficiently until lunchtime.

3. Start strength training.  Not only is it good for me, but hopefully starting my mornings with some weights will give me a little boost.

4. Take more walks.  Walking triggers the body's relaxation response and helps reduce stress, but a 10-minute walk also provides an energy boost.  I work from home so I can easily pop outside for a quick walk when I need to clear my head or get a little energy boost to help motivate me.

5. Make a list of nagging projects.  There are things that I've been needing to do for a while (renew my passport, organize our vacation photos, etc.) that I just keep putting off.  Every time I think of these projects that are either time-consuming or annoying, I just get overwhelmed and put them off some more.  I need to just write these things down and start tackling them one by one.

6. Organize the pantry.  When I'm making a grocery list or cooking dinner, I can't even see to the back of the pantry to know what food I have in there.  It drives me nuts every time because I have to pull out all my cans and jars to find what I'm looking for.  I need to come up with a better system.

7. Tidy up before bed.  Nothing drains me more than waking up in the morning and finding a cluttered living room or kitchen.  I need to take five minutes at night before bed to put things away.

8. If something takes 5 minutes or less, do it now.  All of these little things pile up and end up taking big chunks of my time.  If it's something simple like responding to a quick email or filing that important document, I can take the couple of minutes and do it right away to save me time later.

9. Get rid of unnecessary stuff.  I know we have things that we could stand to throw away (that perfume I never wear, the old can opener that doesn't work), so I need to take the time to go through drawers, cabinets, and closets and purge.  Planning to buy a house and move soon is also a big motivator!

What do you find boosts your energy?

Friday, January 6, 2012

Recap of 2011

This week I've been caught up in making my goals for 2012, organizing the house after a 10-day holiday, and thinking about all of the projects I want to get done this year.  I need to chill out for a second and look back on 2011!  Because this blog is a scrapbook of sorts, I want to go over some of the highlights of the past year, especially because some of them I never blogged about.

At the beginning of the year I started this blog as a creative outlet for myself.  
via

The first few months of the year we were busy getting plugged into our Bible study and opening our home to many people, mostly college students.  I was also in two of my closest friends' weddings.  
I also failed at taking pictures of our life - whoops.
via


via

In May we went to the beach twice: once with my family and once
with Caleb's family.  We had gorgeous weather both trips
and loved the time we were able to spend with our families!

In the summer Caleb was looking to switch jobs, so we were busy traveling for different interviews.
This picture was from the 18 hours we were in Nashville.

Our favorite part of the year was our vacation to Yellowstone and the Grand Tetons!  

August marked the arrival of my first nephew!  He is the sweetest little boy!

At the end of the summer, Caleb accepted a job and two weeks later 
we moved away from our first home together.

In September I ran my first race!

In November we visited Caleb's grandparents' farm.

We were able to spend Thanksgiving weekend with my whole family!

We celebrated our second married Christmas together with lots of Christmas activities.


Looking back, this year did not turn out like we expected.  Caleb was enrolled to go back to school for his MBA, meaning we were staying where we were for a few more years.  Then everything changed: Caleb got a new job, we're living in a different state, and we're looking for a house to settle down in here!  I'm so thankful that our lives are ultimately in the Lord's hands, and that He is in control - not us!  We are so incredibly happy where we are and praise the Lord for all He's blessed us with!

Thursday, January 5, 2012

DIY Sequin Tote


When I saw the idea for a DIY sequin tote on Anna's blog, I knew I had to make it!  I used sequin trim and a canvas tote from Hobby Lobby, and I attached my sequin trim in horizontal stripes with hem tape (above tote).  Then I saw this tote and wanted to make own version.  Using more of the same supplies, I ran the sequin trim around the handles and down the length of the tote on both sides (below tote).  Such a quick and easy DIY, and I always need another bag!